There are two main quest lines in The Final Reich map for Call of Duty WWII Nazi Zombies. The first is the casual set of objectives, and these are telegraphed to the player. While they aren’t easy, they are certainly much easier than the hardcore Call of Duty WWII Nazi Zombies Easter eggs that hide throughout the map. The hardcore path is much more along the lines of what Call of Duty Zombies players expect, so don’t think you’re done once you complete this casual path.
If you ever get stuck, tap the touchpad to bring up your objectives. After spending long enough on an objective, this will also create a white outline around the places you need to go, which is good for finding things hidden around the map, like the paintings in the Voice of God step.
Call of Duty WWII Nazi Zombies Guide – The Final Reich Casual Path
Turning on the Power
To get things started, you’ll have to get the power on. Do this as quickly as possible. The more waves of zombies you waste, the harder things will get later.
Step one is to activate the Sewer Generator. After leaving the main spawn area, find the three valves and turn them to get the gas flowing. If you’re having trouble finding the valves, find the tubes that snake along the ground and follow them. Once the valves are on, activate the pilot light near the big hole in the ground to blow the sewers open.
Drop down into the sewers and you’ll find a generator in this area. Hit square once the prompt comes up to power it on. You can now spend some jolts to enter the bunker and turn the power on there.
The next step is to activate the power in the Bunker. Once you enter this area, you’ll be in the central command room. There are three doors in here, one leading to the lab, one leading the the morgue, and one leading to the salt mine. You’ll need to have the Lab and Morgue doors open for this next part.
Inside the each one, there is a single power panel where you can cycle the power switch to “ON.” Once you activate one, you’ll have a limited time to reach the other and turn it on as well. When both of them are on, the power to the Bunker is activated, and you can now open the door to the Salt Mines.
Getting the Tesla Gun
At the bottom of the Salt Mines, you’ll enter the altar room. Examine the Hilt in the middle of the room to begin the next portion of the quest. You’ll have to kill zombies within the red circle to charge the device. Once it is charged (you’ll know by the bright orange glow), it will begin to rise. Head back up to the control room.
In the center of the room is a closed metal shutter that is blocking the device from rising. Use the crank on it to open the shutters and allow the device to levitate up and onto the track on the ceiling. The lights will go out and you will need to escort the device to to each side of the bunker (the Lab and the Morgue) and collect the two pieces of the Tesla Gun that it generates. When the device stops, make sure to kill zombies within the red circle to charge it and keep it moving.
Once you have both pieces of the Tesla Gun, head back to the Control Room. A flamethrower zombie will spawn here. Killing it will drop its Zombie Head, which will be important later, but you can ignore it for now. Head up the stairs in the control room and put the pieces of the Tesla Gun into the machine, and after a few seconds, it will be created. You can pick it up and wield it if you want, or leave it there if it’s not your weapon of choice. You will need the gun later though, so know how to get back to this area quickly.
The Right Hand of God
Head back into the Salt Mines and examine the device on the left side of the altar room (yes, it’s confusing, but the statue is facing you, so the his right hand is on your left side as you enter the chamber). Head back to the Control Room.
Behind the Tesla Gun station is a breaker panel. Activating this panel begins the Reroute the Power puzzle.
Take note of the colors beneath each of the numbers. They can be red, green, or blue, and the order is random each time you play. You need to flip the switches on the four power stations around the map to the colors indicated, and this has to be done in order. There is also a time limit before the breaker panel resets and will need to be reactivated.
- Panel 1 is located just to the right of the breaker panel where the colors and numbers are shown.
- Panel 2 is in the Sewers near the path leading into the Morgue.
- Panel 3 is in the Sewers in the path leading outside to the River.
- Panel 4 is near the Pub by the entrance to the Tower.
Once you get all four panels set to the correct color, you’ll need to defend the lightning rod at the Tower.
Defend the Lightning Rod
The Tower is just past Panel 4. You’ll need to fork over some Jolts to get through the gate. Once there, activate the device in the middle, but be ready. A massive wave of zombies is going to be gunning both for you and the device. You’ll have to defend the central device for about a minute and then you can activate the two outer devices. These levers are on the front corners of the tower, right and left side. You will once again need to defend both of these levers for another minute or so from the new wave of zombies.
After the lightning rod is activated, head back to the altar in the Salt Mines and examine the Left Hand of God (on the right side of the room).
The Left Hand of God
Head back outside to be greeted by a Zeppelin. Too bad it’s not a friendly. Shoot the orange and red lights underneath it to get the Zeppelin to drop a generator. Be careful, the Zeppelin is lethal and will try to fry you with lightning. Once the generator is dropped, you’ll have to find it.
Once at the generator, kill zombies within the red circle surrounding it to charge it up. After it charges enough, it will explode, leaving a battery. You need to carry this battery to the Left Hand of God in the altar room, but while carrying the battery, you are slowed down and unable to shoot.
You’ll need to do this three times to get three batteries. On the third time, the Zeppelin will pick the generator back up and you’ll need to shoot it down again before you can charge it. Once the third battery is in place, you’ll be tasked with activating the Voice of God. Remember that Zombie Head that we left sitting on the ground? Time to go get it.
The Voice of God
Once you have the zombie head, you’ll need to locate four paintings around the map. Holding L2 will aim the Zombie Head and it will emit a blacklight glow. You need to use this glow to discover a secret combination on the four paintings around the map.
- Painting 1 is in the Mortuary, on the wall to the left side of the stairs.
- Painting 2 is in the Courtyard by the river.
- Painting 3 is in the Sewers near the cage where the weapon upgrade station is.
- Painting 4 is in the Pub just outside the tower entrance.
Aiming at each painting with the head will reveal a different Raven and a Roman numeral number, one through five. The Raven Symbols match with the perks (Bloodraven, Stormraven, etc.) but it might be easier to remember them by which direction the Ravens are facing instead, as each one faces either up, down, left, or right.
Pay careful attention to the Roman numerals. You can get multiple of a single number, and some of them can look a bit tricky (the slant of the lines can make III and IV look similar, for example). Once you’v got them memorized, head back to the Salt Mines and into the altar room.
The central device has each of the Ravens, so enter the numbers into this machine. Once the combination is entered correctly, activate the device to move on to the final step in the casual quest line.
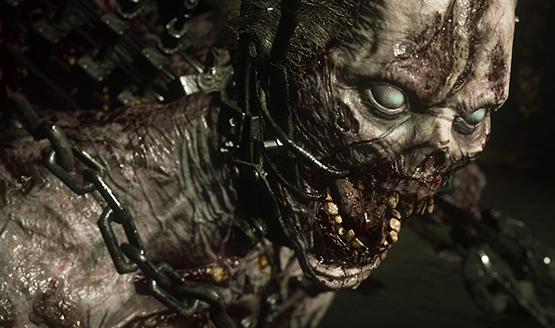
How to Beat the Panzermorder Boss
To bring out the boss, shoot the hilt in the altar room with the Tesla Gun (if you need it, you can run up and grab it from the control room). If you aren’t playing solo, everyone needs to coordinate and shoot it at the same time. Grab the hilt and the Panzermorder will spawn in (gross looking, isn’t he?).
Stay on the surface and don’t get close. Also don’t bother unloading bullets into him, you won’t kill him that way. This boss fight is the same as the Zeppelin phase, only this time, you’ll be inserting the battery into the Panzermorder. Shoot the red light on the Zeppelin to drop a generator, and charge the generator with zombie kills in the radius to get the battery.
Once you have the battery ready, shoot the Panzermorder to stun it. Grab the battery and bring it to the Panzermorder while it is stunned. Do this three times and you’ll be treated to the final cutscene of the casual quest line. Congratulations! All that hard work, and you’ve only beaten the easy path of Call of Duty: WWII Nazi Zombies The Final Reich.