Even though each PS4 comes with a 500GB hard drive, between the mandatory installs and some games going up to 50 GB, many gamers are going to be looking to upgrade their system with a bigger capacity. Thankfully, Sony have made the process of swapping out the PS4’s Hard Drive relatively easy and simple, as long as you follow our guide.
Note: Modifying or dismantling any portion of your console may result in damage if not done correctly. By continuing you assume all responsibility and understand the risks associated with following this guide. However, doing it correctly is encouraged by Sony and will not affect your warranty.
Before starting off, you will need a 2.5 inch internal Serial ATA HDD (not all guaranteed to work, be sure to Google if anyone had any problems with your HDD brand), a small Phillips screwdriver and a place to hold up to 5 screws.
We’d also recommend backing up all your game saves, and here’s how to do that.
1. This process will require you to power down your PS4 completely, so make sure to ‘turn off’ your PS4 and to NOT use the ‘standby’ mode. Once that is done, unplug all cables attached to the system and move it to a safe location that will allow you to work with small screws.
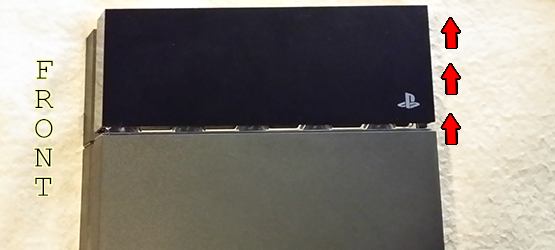
Opening up the bay for the HDD is a bit difficult at first, especially given that it will require a bit of force to do. There are no screws holding the cover in place, only a number of clips, but to remove it, simply lay the PS4 down on a sturdy surface. Once there, use your palms or fingertips on the glossy plastic cap above the disc drive and slide it in the direction indicated by the picture below. Do not put too much pressure on the system or the cover, or you might damage it.
2. Once the cover is off, you will see the HDD bay and the cradle holding it in place. There is only one screw to remove at this point, and it will be in the corner marked with the signature PlayStation symbols (square, triangle, cross and circle). Use a small Phillips screwdriver to remove the screw and store it in a safe location.
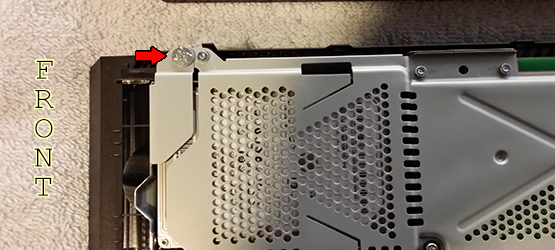
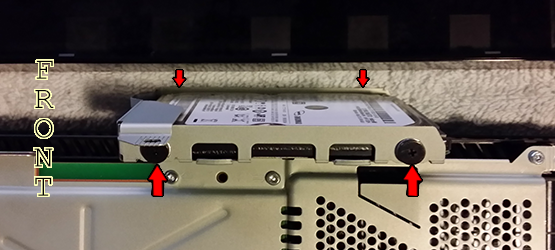
3. Simply slide the cradle out of the HDD bay, but be careful, as this motion will be disconnecting it from the SATA port of the PS4.
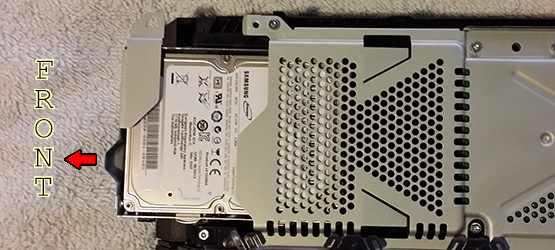
4. Now that the cradle has been removed from the bay, you will need to take the HDD out. To do this, there will be 4 screws to remove, 2 on each side. Once those are out, there will be almost nothing keeping the drive in the cradle, so make sure not to drop it.
5. At this point, all you have to do is insert the new HDD into the cradle and reinsert all 4 screws. Once that is done, simply work the directions backwards, making sure to not damage anything and you will have just upgraded your PS4’s disk drive.
The next time you boot up your console, you will have to run the System Restore function and update the firmware, as well as reinstall all of your games and programs.
If you have any questions about the process, or used our guide and loved/hated it, let us know in the comments below.
Have a question about the PS4? Let us know at [email protected], and if we can help, we will!


