Cold Iron is a unique VR puzzle shooter that offers a lot of depth and replayability to its reflex-based gameplay. There’s a whole lot more to winning a fight than quick hands (but you’ll also need quick hands). When the game ends, the real challenge begins, including unlocking statues and opening a mysterious door for Cold Iron’s secret final encounter. There are 16 statues to earn that will unlock a series of PlayStation trophies as well as that Cold Iron secret ending. While we can’t help you with your reflexes, we did want to find a way to at least offer some guidance on completing each challenge.
We got in touch with Matthew Taylor, co-founder and one half of the team over at Catch & Release, to get his tips on how to get all 16 statues and unlock the Cold Iron secret ending. He was kind enough to send over a full rundown of each of the 16 statues and how to obtain at least a silver on every one. There’s still going to be a lot of personal skill that will determine your end-of-round score, but hopefully Matthew’s tips (and a few comments from me) will set you in the right direction. Without further ado, Matthew Taylor!
Cold Iron Secret Ending and Trophy Guide – How to Unlock All Statues

Cold Iron isn’t for the faint of heart. If you have the grit to make it past all the duelists who stand in your way, you’re still left with the challenge of unlocking the game’s sixteen golden statues. If you can at least muster the skill to earn each statue in silver–a slightly more lenient challenge–you’ll unlock “The Door” and experience Cold Iron’s final deadly challenge. Here are sixteen tips to help you get every silver statue and witness the game’s true ending (Spoilers ahead!).
Editor’s Note: For the trophy hunters out there, “The Door” only requires 16 silver trophies to unlock, but the Platinum trophy will require a gold in all sixteen challenges, many of which require an S rank on each encounter. These same tips can be applied if you are using this as a Cold Iron trophy guide, but the Platinum is going to be an even tougher challenge beyond that secret final encounter.
1. HORSE
Complete the game from start to finish without dying.
-Start from the first duel (Whiskey Sweet) and reach the final credits without dying or exiting to the title screen. It’s as “simple” as that. My advice: start fresh. Getting the Horse Statue is a test of endurance, so don’t attempt this at 3 A.M. after you’ve already been dueling for hours. Rest up and try again later!
Editor’s Note: You don’t need to start from the tutorial, so don’t waste time with the prologue (World 0). As Matthew points out, start from Whiskey Sweet. I will add that you should feel confident in the final encounters of the game before attempting this. There’s nothing more crushing than going into this trial and failing on the Gunslinger or Cold Iron after making it through everything else. Replay the final world until you feel like you’ve mastered the quick reflexes and puzzles required (see below for additional tips on those encounters).
2. GUN
Win a round in under 0.3 seconds.
-The quickest among you will earn this one without really trying. If you’re having trouble, try it in a duel with rhythmic elements like The Tempest. Count each of her lightning strikes and you’ll know precisely how many times she’ll teleport before the bell rings. As soon as you hear the final thunderclap, unholster and fire!
Editor’s Note: The encounter Matthew mentions above is easiest to get this as low as possible for the statue, but when going for low times on other encounters, pay attention to the heartbeats and other mechanics that will offer telltale clues for when the bell is going to ring. Gold requires under 0.2 seconds, and that will be the ultimate reflex test, even for the best gunslingers.
3. WATERMELON
Destroy every watermelon in two bonus levels.
–Cold Iron’s bonus levels are fun, but this challenge is anything but sweet! For starters, wait until you’ve beaten the game before attempting this one. You’ll unlock a “Bonus Rush” shortcut that will let you get back to the bonus levels much faster. Beyond that–let loose! You have unlimited ammo and the statue makes no mention of accuracy, so this is one of few times in Cold Iron that spray and pray really works.
Editor’s Note: Guns in VR are great because you can actually aim down the sights to see where you are shooting. Use iron sights and lead your shots, especially for the golden melons that are further away. Repeated play of the first bonus level should get you familiar enough with it to earn this easily.
4. SCARECROW
Find a creative way to overcome Riverboat Diaz.
-This one is the easiest challenge if you know where to look. Any time during the first few rounds of Riverboat Diaz, look to the sky. It will only take one shot to earn the statue, but stick around until the end of the duel for the funniest secret in an otherwise heavy game.
5. WHISKEY SWEET & 6. BLACK JACK
Defeat Whiskey Sweet with an A rank or better/Defeat Black Jack with an A rank or better.
-The first two duels in Cold Iron are standard western shootouts. You can earn an A rank just by drawing quickly and never getting shot, but if you’re on the slower side try aiming for the head. The occasional bullseye goes a long way, and you’ll have plenty of time compared to later duels.
Editor’s Note: If you are going for the S ranks, speed and accuracy is the key. Be patient and learn what angles you have to draw at to ensure regular bullseyes. It might feel a bit like cheating, but you don’t actually need to have the gun holstered at your side. If you need to hold it out in front of you like some summer blockbuster action hero, you can aim down slightly to “holster” the gun and use both hands for a little more balance, accuracy, and precision aiming (though that’s not quite as satisfying as nailing a headshot from the hip).
7. RIVERBOAT DIAZ
Defeat Riverboat Diaz with an A rank or better.
-Don’t worry too much about Riverboat’s tricks: your score isn’t docked as much for fouling as it is for getting shot. Make sure your draw times are fast, and use the scarecrow trick from #4 to buy yourself some extra time for a bullseye in the final round.
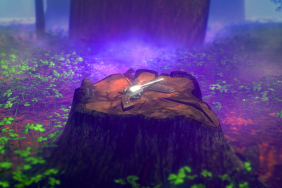
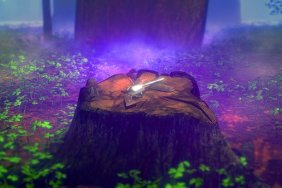
8. WILL O’ WISP
Defeat Will O’ Wisp with an A rank or better.
-Now you’re in another world and every monster you face has a different trick up its sleeve. Here’s a tip that will help you against almost all of them: although you have to keep your gun holstered until the bell rings, you can still turn your body while keeping the gun pointed down. Once you know where Will O’ Wisp is going to appear, position yourself for the fastest draw time possible and get ready for the bell.
9. THE TEMPEST
Defeat The Tempest with an A rank or better.
-Wily gunslingers already know that the color of each lightning bolt before The Tempest begins to teleport clues you in on where she’ll appear next. Advanced players keep another thing in mind: the number of lightning strikes. Count the number of bolts you see and pay attention to the color of the last one. Position yourself for a quick draw and unholster in unison with her final warp. Even novice players can achieve crazy times with this trick.
Editor’s Note: As Matthew mentioned, this isn’t Simon Says. The colors that precede the final one don’t actually matter. So instead of trying to count it off like “Blue, Red, Purple, Blue!” it’s far better to keep your mind clear and just think “1, 2, 3, Blue!” If you get too caught up on the order of the colors and get them wrong, it can severely impact your ability to land that killing shot.
10. NOWHERE MAN
Defeat Nowhere Man with an A rank or better.
-Turn your body to face Nowhere Man as soon as you’ve identified the real one. By preparing yourself before the bell rings, you’ll have a better shot at scoring a bullseye.
Editor’s Note: Each Nowhere Man round is about finding the different one. The final round, however, has three completely identical Nowhere Men (as far as I can tell). Instead of trying to scrutinize the difference that may or may not be there, wait for the bell and see which one twitches first, then twitch faster (Update: Matthew informed me that there is actually a way to tell on the final round, but I’m not going to “shed any light” on it).
11. IRIS
Defeat Iris with an A rank or better.
-Keep your cool! You might be thinking “spray and pray” when Iris disappears into the scene, but bullseyes are awarded in this duel for perfect accuracy. Find her quickly, aim true, and make the first bullet count for an easy A rank.
Editor’s Note: Matthew’s tips are just as likely to nab you an S rank on this encounter! I managed to get an S rank on my first playthrough without really trying because if you hit with the first shot, you’ll be guaranteed a bullseye (due to the long range). Keep an eye out for her laser sight to see where she’s coming from and pinpoint your own shots.
12. A.U. 117
Defeat A.U. 117 with an A rank or better.
-In one of the game’s toughest duels, A.U. 117 temporarily blinds you before shifting side-to-side to throw off your sense of direction. In the first four rounds you can rely on following the small red light on his head, but the final round is all about sound. Use headphones, turn up the volume, and listen carefully to hear which direction A.U. is coming from.
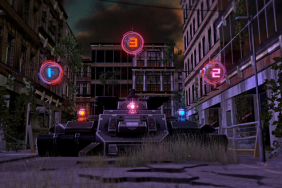
13. THE BEHEMOTH
Defeat The Behemoth with an A rank or better.
-See the drones with a green circle instead of a number? Looks familiar, right? Although you can ignore them and focus on the numbered drones, advanced players should never miss an opportunity to snipe the green drone before finishing the puzzle. Bullseye!
Editor’s Note: Accuracy and the proper order seem to be most important here. Most often, my failure was due to missing the target, rather than getting shot myself. Remember the proper order of the numbers and don’t forget to take an extra moment to shoot the green drone before tagging the final numbered drone, but don’t miss!
14. THE GUNSMITH: Defeat The Gunsmith with an A rank or better.
-There are no secrets here. This duel is skill on skill. Be fast. Aim true.
Editor’s Note: Easily the hardest encounter in the game (I’d say even more difficult than Cold Iron), you’ve gotta be really, really quick to take this guy down. If you haven’t yet unlocked the silver Gun statue, this encounter will almost guarantee your draw times to be under 0.3 seconds. Use the trick of holding the gun out in front of you and steadying it with both hands if you need to, and pay attention to the heartbeats. While it’s different for every round, I’ve found that it each individual round tends to have the same number of heartbeats before the bell, which makes it a bit easier to predict. Good luck on the S rank for this one, trophy hunters!
15. COLD IRON
Defeat Cold Iron with an A rank or better.
-Cold Iron is almost certainly the most intimidating opponent you’ll face, but once you know its tricks things get much more manageable. Stay calm, remember each round and how it changes the gameplay, and you’ll be polishing this statue in no time.
Editor’s Note: The first time you face Cold Iron, it seems nearly impossible, but you’ll learn that the beast has acquired some tricks from your previous encounters. Take what you’ve learned so far into this fight (in particular, think back to the forest area and the tricks they employed there).
16. CHICKEN
Discover the secret chicken in all three worlds.
-My parents love raising happy, healthy chickens (Did I mention I’m from rural North Carolina?). Anyway, those who know chickens know that they love to roost in high places. There’s one chicken hiding in every world. If you think you see one, fire in its direction to let it know. BAKAAAAAAWK!
Editor’s Note: You can get the chickens on any encounter in any of the worlds, so if you’re hunting this one down, simply start up each world from the main menu and immediately start looking for the chicken. No need to wade through 99 other players for this chicken dinner.
Bonus trophy tip: Shoot out all of the things that give off light in the menu/saloon area. Candles, lanterns, etc. Take them all out.
We’d like to give a big thank you to Matthew Taylor and Catch & Release for entrusting us with some of Cold Iron’s secrets and this Cold Iron secret ending guide. If you have any other questions about Cold Iron’s various encounters, secrets, or how to tell which of the three Cold Iron clones is the one to shoot (hint: iris size), throw them in the comments below. You can also reach out directly to the Catch & Release team on their Twitter @tweetandrelease. Now I’m off to attempt to unlock this final encounter and get the Cold Iron secret ending for myself. Good luck everyone!